Showing posts with label WW2. Show all posts

Saturday, April 4, 2015

Creating Winter Germans for Bolt Action


About 6 weeks ago I read a post by Andy Singleton, a great Bolt Action modeler and painter, about his Winter Germans kitbashes. His original blogpost is here and I really recommend it. I was instantly swayed to do something like that myself and asked him some questions on how to go about it. He was great and didn't feel bad about me copying him, which I really respect. Warlord, for which Andy paints regularly, published some notes on Andy's painting on this Warlord page on how to paint Ostfront Germans, but Andy didn't delve into how he built the models in the first place and I figured I could give that a shot.

Warlord, the company that created Bolt Action, currently does NOT have a plastic range of Winter Germans in it's assortment. They recently released a few older, metal sculpts, and there are other companies that also have a handful of sculpts available, like Artizan. But despite the fact that there is a new army book about the Ostfront out, and they recently released a plastic set of Winter Russians, the plastic Germans are missed sorely.

So following Andy Singleton's idea, I created a bunch of Winter Germans, using the Late War Germans and the Winter Russians. Here's a groupshot of a finished squad. The silver model is an Artizan model, a machine gun loader, that I could not create myself.
The first job, when starting this project, is to choose heads for the soldiers. There should be a mixture of helmets, fur flap hats, caps and random headgear, like show in the first picture of the post.
For the helmeted heads, I cut off the helmet of a German and the face of a Russian, like this:
It's challenging and I messed up a few heads before I got it right. For the Russian head, this is a good one to use:
There is plenty of historical evidence about Germans wearing Russian flap hats, and so some of my models have a straight Russian head, but make sure to cut off the little star on the front. 

The soldier below has a Russian face with a German Wool field cap, using the same method as show above and giving the squad a bit of visual variety.
Once you have resolved the head modeling, move on to the bodies. Some of the German soldiers in Russia wore greatcoats, like you can see on the cover of this Osprey book:
My goal is to create Germans in snowy conditions, so greatcoats really look the part. The Winter Russian kit comes with great looking coats, using these Russian coats with the German helmets and kits for the late war German box set, it really works well together. 
Of course the pouches don't match in shape and amount; German soldiers wore three, squarish ones in a row, not two, but some of that can be fixed by modeling the arms in front of the belt and hiding that.
A lot of soldiers wore a white canvas over their greatcoat. To recreate that, use some of the 'quilted' winter Russians. and use green stuff to cover the whole body. Of course I had to cut of all the pouches and the sling.

and the final model:
Although we associate the great coats with the winter armies of the Germans and they are fun to model with, most of the German soldiers had and preferred the reversible white/camo outfit, sometimes quilted for warmth. Here's an example, a spring parka from the middle-late war period.
It's easy to see that keeping the jacket white was not easy!

Here's my take on creating one of those:
I used a quilted Russian and shaved off all the lines from the quilts, like you can see in the left image of the composite about making the white canvas.
Then I used some epoxy to bring the pants down and creat a hood. I used the Late War German arms, a bit thin, but it will have to do.
Below is a model with the great coat arms, and I shaved off the cuff, so it looks thicker. I sculpted the pant bottoms on this one as well.

All the models were based on a rubble/brick base, imagining  a battle in the outskirts of Stalingrad.

This squad has two artizan models in it
Here are some of the models I spend some more time on:

What I love about Bolt Action is the journey of modeling and learning about history. What I love about all the blogs around, like Andy Singleton's, is the inspiration I get from it. I hope that this post will inspire others as well!

SC Mike


Monday, March 31, 2014

Scratch built Bolt Action gameboard Part 2: the finished village!


I finished up the build of a gameboard representing the footprint of a village for my Bolt Action games. The finished board, which measures 40 x 24 and has two equal parts, isn't big enough to cover a side of a a 6x4 foot table, but it was really designed to add some realism to the village part of our table. I always felt that putting building on a green mat didn't look cinematic enough.

Here's the second half being built. Here's the link to the build of the first half, it explains how to stamp cobbles as well: HERE

Here's the finished table
You can see I haven't painted the edge of the new half. Because of that you can also see that despite using tough composite board, there is still warping going on. The right half warped quite badly, the new part a bit less, because I changed the order of the build of the board, starting with the composite board and working my way up. 
You can see I added some ornamentation in the stone work, with crosswalks and a circle in the square area.

I haven't finalized what should be on the right top, where the tree is now. I feel it needs a fountain or garden to emphasize the importance of the tower. I also painted the side walk around the tower different, to make that area stand out. 

Once you start going to eyelevel with the camera, the board and models really come to life. Enjoy some of these action shots!

Below you can see the warping showing, right behind the Sherman. I am not bummed about it, but if I make another board, I will make sure this doesn't happen again. 
The valuable truckload 


The hedges around the middle part of the board were made of Scotchbrite steel scrubbers. I cut it into strips, glued it to styrene and painted it. They look fun! 
Top view 
The objective is being surrounded... 


Sunday, March 23, 2014

Scratch built Bolt Action Game Board, Part 1

In one week I built one side of a village board for Bolt Action, using composite board, foamboard, beach sand, glue and some dedication. Here is the first part, 20x24 inches, from start to finish

After mapping out the road and side I started making the cobble stone road. Using a brush without the hair and shaped like a brick, I started punching in the design. I had to take the top paper off the foam board to expose the soft foam that really takes the indentation well. Here are images of that technique from a previous project:


Here is the road and sidewalks. For those sidewalks I used a larger stone (different brush) and made them look more distressed looking by picking at the foam a bit. I didn't count how many times I had to punch, but it took me three sessions; after a while your eyes and hands go nuts!

Here's the design, sanded as well. Realize that you can't spray the foam, so I had to paint the whole thing by hand.

And now the fun part; the finished board images! And again, Bolt Action is so cinematic, it's great to work on armies and terrain.
The tree on the right is part of a set of forest terrain that I made last month, post coming soon.


The captain is analyzing his options...


Part two will be the other side of the board, it will feature this building and a village square type scene.

Hope this inspires!

SC Mike

Tuesday, February 25, 2014

More scratchbuilt Terrain for WW2 gaming: the finished tower

The above image proves it: a decent piece of terrain with our beloved models look great, cinematic and overall it makes me want to play Bolt Action again and again. Maybe that's why I have been on a terrain building spree. Here's the latest, finished building:
I wanted it to look like a North Italian type building, with the slanted roof and the light colored stonework.It's not a realistic piece, but it is functional and it looks the WW2 part. The stairs coming down are big enough for a model on each step, so they stay in coherence when moving through.
Below is the back with a similar set of stairs. You can also see the city shield of Como, a town in Northern Italy.

View from the top. You can see the Warhammer pieces on the side of the wall look fine, especially once I added a few roof tiles.
Once you start taking close ups, the terrain really comes to life:
The walk ways are 1.5 inch, so models have enough space


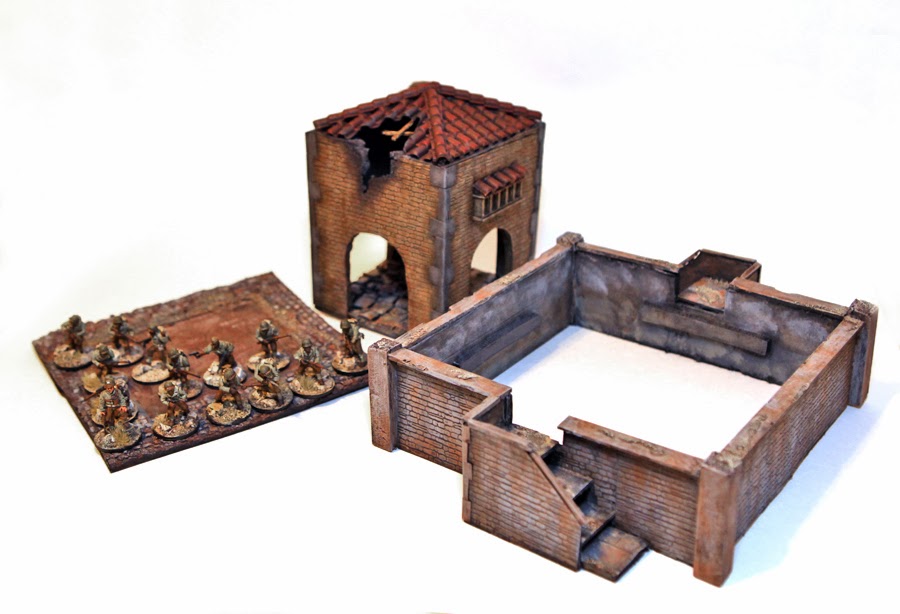
As mentioned in previous posts, this piece is built up in 3 parts. If you don't want to use the wall and stairs, you can just use the tower and base...

Or make the base into a little square and put the tower on by itself. The walls could be made into a field headquarters or some storage area for objective purposes.
The floor of the tower is made to look very old with broken flagstones and lots of rubble, although still flat enough to put models on.
I am now pondering more stuff, like a town square and roads. I have been looking online for inspiration, and my first impressions are that the battlefields we create for our games are way to clean looking. It's astounding to see the destruction of urban warfare in WW2, like the shot below. 
It would be hard to design something for Bolt Action that looks like that. The image below might be more feasible. Interesting to see that the road looks like dirt, although it probably isn't. But the rubble and dust create a cover over it, which would be easier to model then the cobble or flagstone I was thinking of before..


This was the final part of this 3 part series. Below are the other two parts:


If you click on the label Terrain on the side of this blog, you can find all the terrain I have built over the last 4 months. Hope this inspires!

SC Mike