Saturday, April 4, 2015

Creating Winter Germans for Bolt Action


About 6 weeks ago I read a post by Andy Singleton, a great Bolt Action modeler and painter, about his Winter Germans kitbashes. His original blogpost is here and I really recommend it. I was instantly swayed to do something like that myself and asked him some questions on how to go about it. He was great and didn't feel bad about me copying him, which I really respect. Warlord, for which Andy paints regularly, published some notes on Andy's painting on this Warlord page on how to paint Ostfront Germans, but Andy didn't delve into how he built the models in the first place and I figured I could give that a shot.

Warlord, the company that created Bolt Action, currently does NOT have a plastic range of Winter Germans in it's assortment. They recently released a few older, metal sculpts, and there are other companies that also have a handful of sculpts available, like Artizan. But despite the fact that there is a new army book about the Ostfront out, and they recently released a plastic set of Winter Russians, the plastic Germans are missed sorely.

So following Andy Singleton's idea, I created a bunch of Winter Germans, using the Late War Germans and the Winter Russians. Here's a groupshot of a finished squad. The silver model is an Artizan model, a machine gun loader, that I could not create myself.
The first job, when starting this project, is to choose heads for the soldiers. There should be a mixture of helmets, fur flap hats, caps and random headgear, like show in the first picture of the post.
For the helmeted heads, I cut off the helmet of a German and the face of a Russian, like this:
It's challenging and I messed up a few heads before I got it right. For the Russian head, this is a good one to use:
There is plenty of historical evidence about Germans wearing Russian flap hats, and so some of my models have a straight Russian head, but make sure to cut off the little star on the front. 

The soldier below has a Russian face with a German Wool field cap, using the same method as show above and giving the squad a bit of visual variety.
Once you have resolved the head modeling, move on to the bodies. Some of the German soldiers in Russia wore greatcoats, like you can see on the cover of this Osprey book:
My goal is to create Germans in snowy conditions, so greatcoats really look the part. The Winter Russian kit comes with great looking coats, using these Russian coats with the German helmets and kits for the late war German box set, it really works well together. 
Of course the pouches don't match in shape and amount; German soldiers wore three, squarish ones in a row, not two, but some of that can be fixed by modeling the arms in front of the belt and hiding that.
A lot of soldiers wore a white canvas over their greatcoat. To recreate that, use some of the 'quilted' winter Russians. and use green stuff to cover the whole body. Of course I had to cut of all the pouches and the sling.

and the final model:
Although we associate the great coats with the winter armies of the Germans and they are fun to model with, most of the German soldiers had and preferred the reversible white/camo outfit, sometimes quilted for warmth. Here's an example, a spring parka from the middle-late war period.
It's easy to see that keeping the jacket white was not easy!

Here's my take on creating one of those:
I used a quilted Russian and shaved off all the lines from the quilts, like you can see in the left image of the composite about making the white canvas.
Then I used some epoxy to bring the pants down and creat a hood. I used the Late War German arms, a bit thin, but it will have to do.
Below is a model with the great coat arms, and I shaved off the cuff, so it looks thicker. I sculpted the pant bottoms on this one as well.

All the models were based on a rubble/brick base, imagining  a battle in the outskirts of Stalingrad.

This squad has two artizan models in it
Here are some of the models I spend some more time on:

What I love about Bolt Action is the journey of modeling and learning about history. What I love about all the blogs around, like Andy Singleton's, is the inspiration I get from it. I hope that this post will inspire others as well!

SC Mike


Sunday, February 8, 2015

Bolt Action Flyer! BF-109 for Afrika Korps

Although flyer models don't really play a role in Bolt Action, I love to use them in our games to enhance the cinematic experience. They are really easy to incorporate into a game, using a 1/72 scale kit, a bamboo skewer and a Games Workshop 60 mm base. Once you have played with actual plane models, you don't want to go back!!

Recently I put together a Messerschmitt BF-109 for the Afrika Korps. My friend John put together a little Afrika Korps army and I thought he could use this plane to go with his troops.
I got the idea of the paint scheme in my Finescale Modeler from last month - it had a detailed build of the flyer of Hans Joachim Marseille, who's airplane is featured in a lot of 1.32 scale kits.  

My model was not correct, since the 1.72 scale kit came from a Revell Battle of Britain set, from 1940, so the airplane doesn't match (wingtips). But for our beloved game, it would do just fine. Here's a quick build story:

1. After building, I preshaded the panel lines across the entire plane. Notice also i built a little tropen filter above the engine exhaust. 
2. Priming with Tamiya desert yellow, you can see pre-shading does work well to create natural looking panel lines. 
3. The Messerschmitt has a gnarly cockpit with lots of panels; I asked my wife to create masks for them and put them on, her eyes are perfect for that job. The cockpit needed two coats of primer. 
4. Decals took forever, and the 1/72 kits are filled with them, and the small size makes it pretty challenging. The yellow numbers are actually from a Tamiya M8 Grehound kit in 1/48 scale; it's pays off to keep all your unused decals from previous builds. The kit didn't come with a swastika for the tail, I decided it would be too expensive to buy a whole decal sheet for this purpose

And here is the plane on it's base:
I really recommend building some nice looking flyers and use them in your games. The models are cheap, the history is fun and your games will get better! 

I have built two other airplanes for Bolt Action,  below are the links:

2. Mustang

Hope this inspires!

SC Mike


Wednesday, December 3, 2014

Bolt Action: cheap alternatives to tanks, Part 2


If you caught the first installment of this series, you will remember the low cost Revel Pnz IV kits.

I decided to pick up five of them after finding an ebay seller that gave me a good combined shipping
deal.


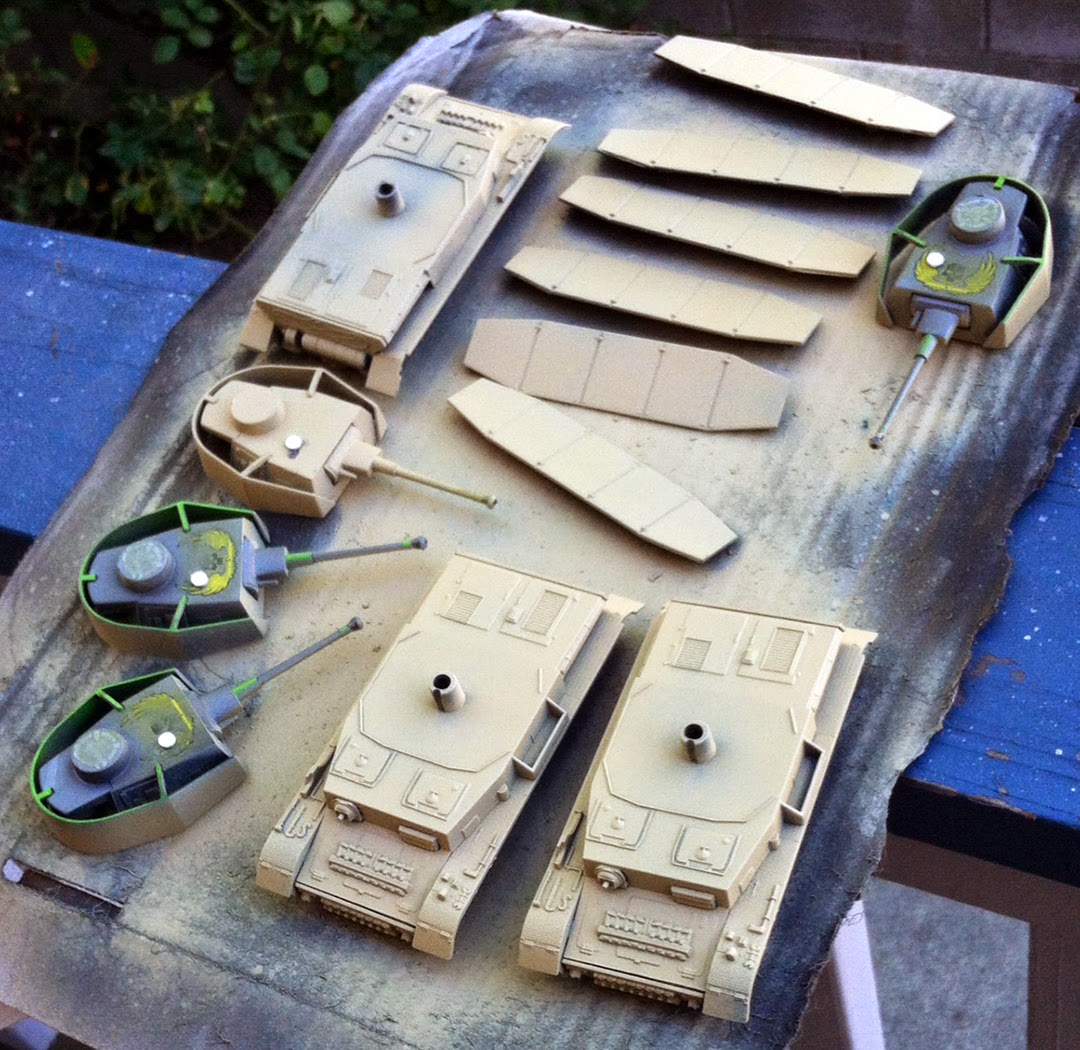
These kits are decent but not perfect, so I decide to make a couple simple changes to make them a bit more realistic.

First detail that was missing was the round vent on the top of the turret. Adding a simple detail like this really goes a long way and brakes up the empty space, also this one detail is one of the Pnz IVs iconic identifying features.


I used a hole punch and some plastic card and a smaller punch to make a smaller disc that is under it to raise it up a tiny bit.


The second change I made was to trim the rear lower skirt to a taper as it should be, when flipped over to the correct height the corner that is cut off becomes the bottom rear. Check out the difference between the first two images in the post.


After that a quick scuff over the graphics some primer and base paint,


I decided not to paint the track sections, they come black and I just brushed on the yellow to the hull side and wheel centers.


 Then it was off to the airbrush for a Normandy style three color camouflage pattern.


As you can see I masked some of the skirt panels to keep the camo off them to represent replaced sections as they were lost or damaged frequently, I may even cut one or two off at some point and have them missing a few.


after that, painting in the tracks, muffler and tools, painting the tank numbers (these were painted by hand by the crew) and a tan drybrush to pick up some highlights and blend it all together.


Now I have a finished German Pnz IV zug for Bolt Action Tank War for under $50. They are not perfect, but it will get me on the table for some games and didn't have to rack up the credit card.


John

Thursday, October 9, 2014

Bolt Action: Cheap alternatives to tanks!

With the release of the new Tank War supplement for the Bolt Action WWII system, many of us find ourselves dreaming of lots of tanks rolling over the tables in our upcoming games.


Warlord has a few new releases and some plastic kits , but most ring in at $30-50 for an oddly underscale lump of resin and lead. (don't get me started on those tiny jeeps)
Most of us have gone the way of using some of the high quality plastic kits in 1/48 scale or even some nice die cast stuff that is already built, but even these options hammer away on the wallet still around $20-50.
How about some super cheap kits that you can buy truckloads of you say?

How about $8 Shermans and Panzer IVs? Two of the most prolific tanks for the two big armies are available in 1/48 scale for the price of a Mclunch.


 Revell has rereleased a couple of 70's snap together WWII tanks that you might consider for your gaming needs. The Combat Crushers kits are definitely targeted to kids but I ordered a couple to see if these toys can be used as a decent low cost option to bolster your armor to the sizes needed for the new Tank War games.


These kits are blister packed and prepainted in crazy graphics to grab the attention of kids , but I figured with a little work and some paint they might be useable.

You can find them searching for Quake and After Shock with Revell on Ebay.

Unboxing reveals how simple these kits are and they go together in a few minutes. The horrible graphics are tampo printed and need to be knocked down a bit with some sanding before you paint over them to avoid seeing the designs under the paint.


The Sherman is an odd kit with the late war HVSS type chassis with what looks like a 105 turret and a early 75 gun. Purists out there may not want to deal with this, but on the good side, it looks like a sherman tank if you dont look too close and its scale is pretty good.

Here are some pics with a Tamiya Sherman based Firefly, as you can see the height length and width all compare pretty well.


A little paint goes a long way and this odd kit can look pretty presentable with a simple quick paint job. The .50 cal machine gun looks pretty silly so  drilled out the grips and added a bit of rod to make the barrel look better

The Panzer IV kit fares a bit better, once you flip the side skirts over where they should be, it looks pretty good. You could even make an earlier version by ditching the skirts and turret shields, and even chop the barrel and do a little plastic card work to make the F1, sure the details are molded on and not too amazing but it's really pretty decent on the table with a paint job. A nice airbrush camo job will really make this thing a contender.

 Here is mine waiting for some camo. I drilled out the barrel but that's about it.


One other problem is that these kits don't have decals. 1/48 decals are available out there, and if you have been using plastic kits, odds are that you have some extra sitting around and if you are planning to make a fleet of these you can find a sheet with lots of 1/48 decals reasonably,


So is it worth it? I think the average player would say yes, if you love building superdetailed models, not so much. A Tamiya kit can be found on Ebay for around 30 bucks and is a wonderful kit to build, and that's cheaper than a rhino, but you can buy 3 of these Panzer IVs for that and they look pretty good on the table...so I guess it's up to you.

I think I will be buying a few more of the Panzers and a decal sheet set for my Germans, add some weathering and some stowage and see how they look.

If you do go after these snap kits, be careful of the shipping fees and find a seller that will combine at a reasonable fee, most of the 8 buck kits seem to have that much in shipping fees, and that kind of kills the great deal, so make sure you get a good combined rate.

John

Monday, March 31, 2014

Scratch built Bolt Action gameboard Part 2: the finished village!


I finished up the build of a gameboard representing the footprint of a village for my Bolt Action games. The finished board, which measures 40 x 24 and has two equal parts, isn't big enough to cover a side of a a 6x4 foot table, but it was really designed to add some realism to the village part of our table. I always felt that putting building on a green mat didn't look cinematic enough.

Here's the second half being built. Here's the link to the build of the first half, it explains how to stamp cobbles as well: HERE

Here's the finished table
You can see I haven't painted the edge of the new half. Because of that you can also see that despite using tough composite board, there is still warping going on. The right half warped quite badly, the new part a bit less, because I changed the order of the build of the board, starting with the composite board and working my way up. 
You can see I added some ornamentation in the stone work, with crosswalks and a circle in the square area.

I haven't finalized what should be on the right top, where the tree is now. I feel it needs a fountain or garden to emphasize the importance of the tower. I also painted the side walk around the tower different, to make that area stand out. 

Once you start going to eyelevel with the camera, the board and models really come to life. Enjoy some of these action shots!

Below you can see the warping showing, right behind the Sherman. I am not bummed about it, but if I make another board, I will make sure this doesn't happen again. 
The valuable truckload 


The hedges around the middle part of the board were made of Scotchbrite steel scrubbers. I cut it into strips, glued it to styrene and painted it. They look fun! 
Top view 
The objective is being surrounded...