Tuesday, February 25, 2014

More scratchbuilt Terrain for WW2 gaming: the finished tower

The above image proves it: a decent piece of terrain with our beloved models look great, cinematic and overall it makes me want to play Bolt Action again and again. Maybe that's why I have been on a terrain building spree. Here's the latest, finished building:
I wanted it to look like a North Italian type building, with the slanted roof and the light colored stonework.It's not a realistic piece, but it is functional and it looks the WW2 part. The stairs coming down are big enough for a model on each step, so they stay in coherence when moving through.
Below is the back with a similar set of stairs. You can also see the city shield of Como, a town in Northern Italy.

View from the top. You can see the Warhammer pieces on the side of the wall look fine, especially once I added a few roof tiles.
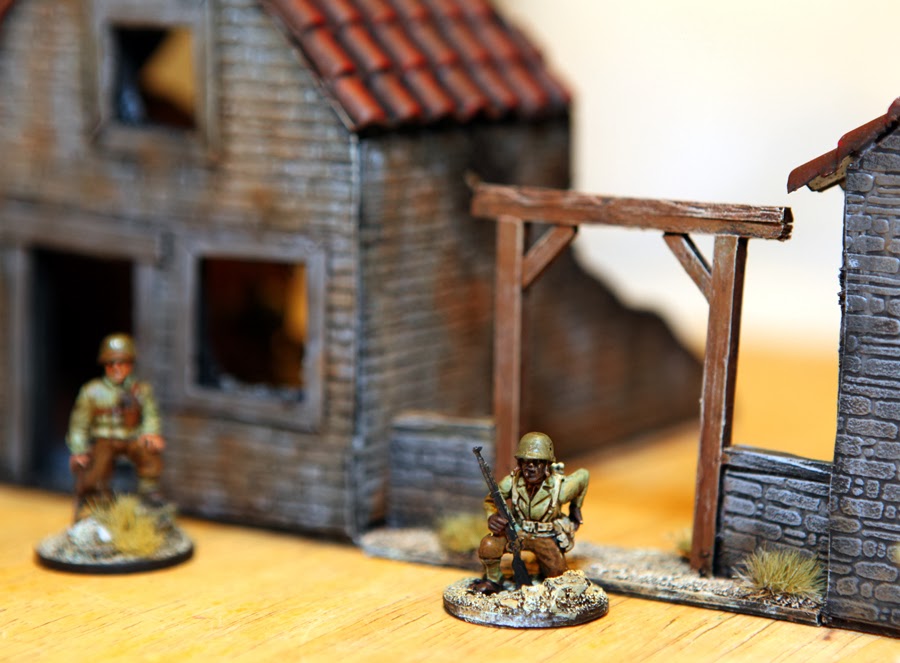
Once you start taking close ups, the terrain really comes to life:
The walk ways are 1.5 inch, so models have enough space


As mentioned in previous posts, this piece is built up in 3 parts. If you don't want to use the wall and stairs, you can just use the tower and base...

Or make the base into a little square and put the tower on by itself. The walls could be made into a field headquarters or some storage area for objective purposes.
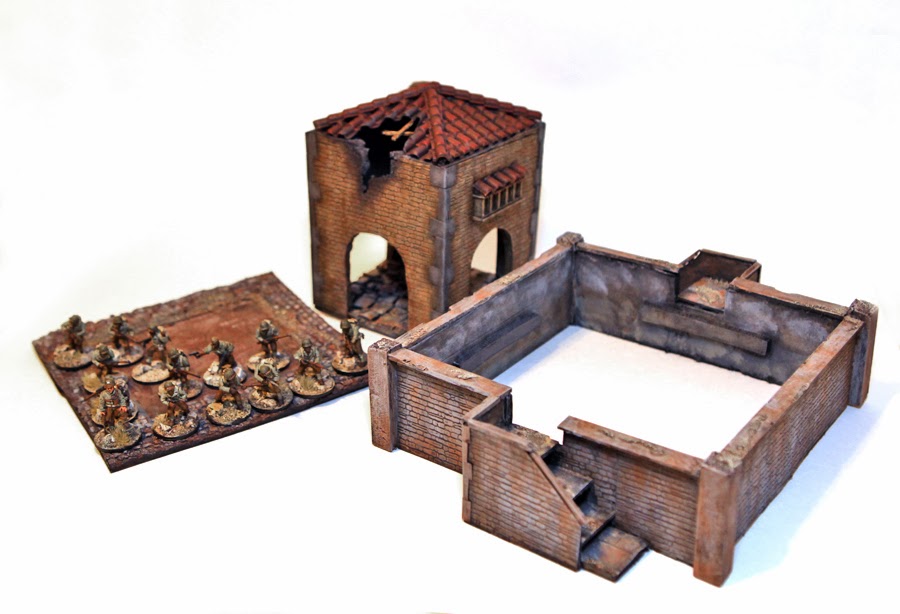
The floor of the tower is made to look very old with broken flagstones and lots of rubble, although still flat enough to put models on.
I am now pondering more stuff, like a town square and roads. I have been looking online for inspiration, and my first impressions are that the battlefields we create for our games are way to clean looking. It's astounding to see the destruction of urban warfare in WW2, like the shot below. 
It would be hard to design something for Bolt Action that looks like that. The image below might be more feasible. Interesting to see that the road looks like dirt, although it probably isn't. But the rubble and dust create a cover over it, which would be easier to model then the cobble or flagstone I was thinking of before..


This was the final part of this 3 part series. Below are the other two parts:


If you click on the label Terrain on the side of this blog, you can find all the terrain I have built over the last 4 months. Hope this inspires!

SC Mike

Tuesday, February 18, 2014

More scratchbuilt terrain for WW2 games Part 2: making cobblestone streets the hard way..

Here's is the image where I left off in my previous post:
You can see the scratchbuilt tower, standing on a little cobblestone square, a small plaza of sorts. It looks old, worn, like it has been walked on for hundreds of years. Here's a close up of square which measures about 8x8 inches.You can see the cobblestones have nice irregularity to them and with a bit of sand (which respresent debris from the damage to the building) it looks pretty cool.

Here is how I did that.
Step 1. on your piece of foam board, tear off the top layer of paper to reveal the softer middle part:
That is not that easy and in the future I will have to look for a different board, the paper is really stuck on there! After a minute here's the result. I just did a small side for the sample:
You can tell that using your nails to get underneath the paper, creates little craters and dents. That actually helps it make it more realistic, as you will see.

Step 2: remove hair from an old brush and shape the metal part into a stone of your liking

Step 3. Using a ruler (or not), start punching the brush end into the foam in a pattern you like.
After 10 seconds you have something like this:
Now the paper that we couldn't get off, we can use to our advantage. In the square base for the tower, that's where I added the sand, but in the example below, the paper parts that didn't want to come off, you make into stucco parts of an old wall. I painted up a little piece in two different looks, for you all to see. I also made another cobble brush, with more round stones. Of course the painting can be done a lot better, this is just for example. 
Step 4: OK, here's the final step: paint it up! I painted my cobblestone square in grays and browns and highlighted a bit with lighter sand colors. Here's the result: 
It has a wonderfully old look to it, very medieval and so perfect for Bolt Action in Northern Italy where many of these streets and squares were still in existence. 
The sand really adds some depth. 

You can do different patterns, like circles AND if you paint stones individually, you can make a great red brick house with gray mortar 

Part 3 will be the final post of this building, which was started HERE in part one

There are some amazing modelers out there that do this technique infinitely better than myself, please research it a bit online. There are different boards and foams available that will make it easier. I myself just kind of solve problems at hand with the stuff I have, which is part of the journey!

SC Mike

Sunday, February 16, 2014

More scratchbuilt terrain for WW2 games Part 1

After finishing up a bunch of buildings for our Bolt Action games here in the Bay Area (Santa Cruz, CA), I figured I would go back to tanks and little guys. But somehow I kept thinking about building a bigger building, with stairs, and with some height. Since my American army is based on the 92nd African American division in Northern Italy in 1944-45, I went and looked for a design that would fit that.
This building is in Florence, a big chapel, with the big doors and the shallow shanted roof, much less steep then steeples in North West Europe. Of course I wansn't going to build that thing, which besides being impossible for a mediocre builder like me, it also is not very practical. I like my buildings to be playable first and realistic second. 
On to the next picture:
You can see two things: lots of destruction in the urban/village environment (this would make a cool diorama) and the difference in height, which makes our games more visually appealing.

So this is what I put together:
The tower/chapel is finished, but bottom part is still getting some weathering and sand. You can see the impact of a shell on the roof, which always looks the part. You can also spot a (grey) Warhammer piece, I removed all the skulls and added the rooftiles, it will look nice. 
The building is simple and very accessible, which means we will really use it, for objectives, cover and maneuvring. 
The elevated base has two stairs and a little stone area around the tower. There is room for plenty of models and all the walkways are at least 1.5 inches. You can see on the back another Warhammer piece, I removed the skull and will paint a city shield on it, like this one from the city of Como

Above you can see the nice vertical look that some higher buildings create.

I built the whole thing in pieces, that can be taken apart for easy travel, but also for multi use. Here's the tower by itself, with a little cobblestone square around it. The square cobblestone base is loose from the tower.
Here's that base, with the cobblestone bottom put on the ground. Here, after painting, it could be come a command post or a spot for a Heavy AT gun. You can see the support I glued halfways down the side that keep the tower up when the cobbestones lay up top.
Here are the loose pieces.

To find the materials for these buildings, go here

Hope this inspires! Part two coming up: how to make cobbestone streets!

SC Mike


Tuesday, February 4, 2014

Scratch built terrain Part 3: walls, barn, ruin and putting it all together!

Here's the third and final post of this short series about making scratch built terrain. As with all the terrain in this series, it's all meant to be functional and accessible, not just terrain for show.

Let's start with a set of low walls
The walls have a base of Warhammer Fantasy movement tray, built up with balsa wood piece which was then covered with the styrene cobble stone sheets. 
In order to make good transitions between the different wall pieces, I made some pillars, which frame the corners nicely. I made a total of 5 pieces plus three little pillars, which could make a good size yard or so.

On to the ruin. Again, the same size as all the houses in this set, but this time very functional and open and with a upper level. As you can see, adding sand to the edges of the ruined walls really adds realism later on.
Here's the painted version:

and with a squad in it. Good looking cover!

I made an open garage/barn like structure, which again is open and very accessible.

With roof tiles to make it look snazzy

And here is the whole set together: 


Wednesday night I will use this stuff for the first time. Report will follow!
Hope this inspires!
Here are the links to the previous parts:

Part 1, the House this part also has links to the styrene materials!


SC Mike


Monday, February 3, 2014

Scratchbuilt terrain Part 2: three row houses


I finished this larger terrain piece over the last week or so; but in my excitement I completely forgot to take any production pictures, and so the finished terrain piece is all I can offer you.

With the images above you can see both viewpoints in the front. With the same grey paint scheme as described in Part ONE of this series, and similar burn damage around the areas that have taken a big hit. The piece is about 12 inches long and the three houses individually are the same size as the single one from part one.

I added broken glass to the windows, using old blister packaging. It really adds a nice touch and is very simple, as you can see below, there is glass in all three windows.
In contrast to the monochramatic front, I decided to paint the back more colorful. Also, I imagined it to be three separate houses, so they would all have different interior colors.

Here's a back view of glass in the top window

Some models for scale. All the doorways are large enough for models to walk through. I find it looks better cinematically during the game if the models can actually move through the terrain in a realistic manner

The left top of the piece has a little ledge that could hide a lonely sniper...

but the piece is also big enough for a good size squad!

It's fun to photograph the models inside this model...

this one looks awesome!


Again, here's Part One of the 3-part series, which concludes Wednesday!

Hope this inspires! And anyone in the Bay Area that wants to play Bolt Action, we are playing this coming wednesday evening at Mythic Games in Santa Cruz which has just added the Bolt Action line to its product offerings!

SC Mike